
D-empress went the whole nine yards on her recent trip to Dubai. - Contributed
Henna body art is a tradition that has been practised for over 1,000 years. Making your own henna paste for body art or hair colouring is a fairly easy process, although you often get the best results when you practise often. Henna paste recipes can be tailored to your preferences. Most often, you have everything you need to make henna in your kitchen. Follow the rules: sour, sweet, sticky, skin-safe, and always use fresh henna, for best results every time.
Henna is an alternative to getting your body permanently tattooed with art. Henna application is an ancient art that can be traced as far back as 2100 BC. Traditionally, henna is used to adorn brides in India. Ancient Egyptians believed that henna helped to increase awareness of earth's energies. Here are the basic steps to creating your own henna tattoo. You can buy already mixed henna, or mix your own.
Instructions
Things You'll Need:
❁ Fresh henna - body art quality, pre-sifted and 100 per cent pure
❁ Lemon juice, lime juice, rain water, red wine, tea, or other sour acidic (low pH) liquid
❁ Sugar, honey, syrup, melted candy, fructose, or other sweet and sticky substance
❁ Essential oils that contain terpinols - Tea tree, clove bud, lavender, ravensera, or cajeput
❁ Non-metal mixing bowl and spoon or chopsticks for stirring
❁ Plastic wrap or lid
❁ Plastic bags/carrot bags
Step 1
Buy the freshest henna powder you can afford. Henna loses potency over time, so when the powder has lightened and turned brown, it won't leave a good stain. Look for brownish-green dark henna. Bright green henna may have dye added, to make it look fresh. The best hennas are pre-sifted; cheaper hennas may need to be sifted for body art. Store left-over powder in the freezer, it will stay potent for at least a year.
Step 2
Measure out henna powder into mixing bowl . For body art, use a teaspoon for a few small designs, several tablespoons for 10 to 50 designs. For hair, use about 100g for chin length, or 200g for curly shoulder length. You can freeze leftover paste for a few months, so don't worry if you make too much.
Step 3
Add sour liquid while stirring. You want a consistency between toothpaste and pudding; paste holds onto the spoon and barely drips. Add the liquid a small amount at a time so it doesn't get too runny. Make sure you smash all lumps that form. For hair, add more liquid, or add water. It's easier to get into hair when it's thinner. For body art, it needs to hold together.
Step 4
Add sugar. Like the liquid, add it slowly, until you get a stringy texture. It's perfect if you can draw it out into long lines without breaking. If you want, you can add the sugar first, then liquid, or both at once. Experiment to see what works best for you. If your paste is for hair, skip this step.
Step 5
Add essential oils. For sensitive skin, use lavender only or skip this step. Add about 1-3 drops per tablespoon of oil. You can use any oil that's skin-safe, but only oils containing terpinols will darken henna (and eucalyptus isn't one of these.) The above list names some of the best, although there are others that may help darken henna. At this step, your paste should be smooth and thick.
Step 6
Cover the bowl with plastic wrap, foil, or its lid. Set it in a warm place, and wait. Henna needs from 4 to 24 hours to release its dye. Check the henna every few hours. When a brown crust is on top, the henna is near its peak. When you see drops or puddles of dye, the henna is at or passing its peak. If the paste has become dark brown throughout, it's probably degraded and will not stain well. Timing henna takes practice; low pH and heat speeds up the process.
If you need it to be fast, try leaving it on a warm coffee pot. To slow it down, put it outside on a cold night.
Step 7
Use or store the henna when it's ready. Either store it in sealable bags and freeze, or use immediately. If the paste seems too thick, thin it before using/freezing. If it's for body art, you may want to strain it to make sure it's lump free. For hair colouring, you can now add conditioner, olive oil, eggs whites, yoghurt, or any other product you like.
How to apply design
Mix the Henna Paste
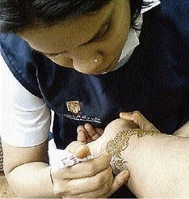
An artist applies henna pattern to the wrist. - Contributed
Step 1
Pour the contents of your bag of henna powder into a ceramic bowl. Always use high quality, body art grade henna.
Step 2
Add 1 tsp. sugar to the henna powder and mix in. The sugar helps the henna stick to skin, so that it will stay on longer without cracking, producing a deeper colour. It also makes the henna paste smoother and easier to work with.
Step 3
Add just enough lemon juice to get a brownie batter consistency. You could also use vinegar, wine or any other citrus juice. The sour liquid releases the plant dyes in the henna.
Step 4
Cover the bowl with plastic wrap and let the paste sit until dye release is achieved. You'll know this when the surface of the paste turns brownish.
Step 5
Add your "terp." Terpines are hydrocarbon solvents that release and darken the henna. Tea tree, cajeput and ravensara are the most common choices. Aromatherapy grade oils are safest for the skin.
Step 6
Re-cover the henna paste and refrigerate until ready to use (or freeze if you won't be using it within a few days).
Prep the henna paste
Step 1
Strain your henna paste to remove lumps by placing a nylon stocking over a cup and spooning the henna mixture into it.
Step 2
Pull the stocking out of the cup and put the toe end, full of the henna paste, into a carrot bag.
Step 3
Gripping the bag tightly with one hand, pull on the end of the stocking with the other hand so that the henna is squeezed out.
Step 4
Pull the stocking out and the henna should be inside the carrot bag, smooth and ready to use.
Step 5
Snip off the end of the carrot bag and squeeze the paste through the bag into a one-ounce applicator bottle.
Draw on the design
Step 1
Prepare the skin by washing the part to be tattooed in hot, soapy water. You can also wipe it with an astringent to remove body oils and allow the henna to stick better.
Step 2
Choose a simple design with a lot of thick, heavy lines to start - it's easier for beginners. You can either hand draw your own design, or use something you found as a reference.
Step 3
Allow the henna paste to dry on the skin once you're finished.
Step 4
Mix equal parts lemon juice and sugar together and heat on the stove. Allow it to cool.
Step 5
Apply the mixture to the henna design once it's dry to the touch, but not yet flaking off. This will seal it so you'll get a deeper, longer-lasting result. Apply it very carefully with a cotton swab.
Step 6
Heat the design with a hair dryer to set the seal.
Step 7
Scrape off the dried henna with your fingernails and gently remove the sealant by rubbing with some olive oil.
Source: http://www.ehow.com/how_2041421_make-henna-paste.html

D-empress in Dubai after her henna application. - Contributed
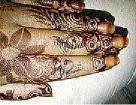
Henna pattern done at the Flora Spa. - Contributed